

Ready, Set, “GO”! Daytime Urine Training Part 1
Now let’s talk about daytime toilet training for urine. This is usually the best place to start. If your child has already used the toilet a few times, or has shown an interest the toilet, you might want to try a less intense method than what we’re going to describe here. There are some excellent books and websites for these less intense methods. A great book is Toilet Training in Less than a Day, by Drs. Nathan Azrin and Richard Foxx. Their approach is similar to the one we will talk about. It has been used with success by millions of families. Autism Speaks also has an online “Toolkit” that is available to everyone free of charge.
In this program we’re going to talk about a method for children with autism and other developmental conditions. You can use this with typically developing children also. It’s best if your child has at least some of the readiness signs listed above. Set aside 2-3 days to focus almost entirely on this training. So be prepared to get not much else done for a couple of days.
Let’s Get Started – Block off Time for Training
First, set aside a significant block of time to devote to this toilet training. We recommend a four-hour training session. You should have two sessions a day for 2-3 days in a row. So, you might want to start on a weekend unless you’re at home with your child during the week. You’ll need to devote all of your attention to your child for about four continuous hours. For this reason, it’s helpful if you can get another adult to take any other children out of the house during these toilet training sessions.
Make the Bathroom the “Place to Be”
The first thing to do is to make the bathroom a very fun place to be. If you have more than one bathroom in your home, pick one to use. Put up pictures of your child’s favorite characters. Or choose another of your child’s favorite things as a theme for decorating your bathroom. For example, if your child
has a favorite Disney movie or character, you could put up a picture or two from that movie. You could also put some books about the movie and a few little character toys in the bathroom. Some parents put a small TV, DVD player or tablet in the bathroom which the child only uses when she is sitting on the toilet. Other parents have had success with music. In this case, some preferred pieces of music are only played when their child is sitting on the toilet. Others allow their child to play with the parent’s cell phone only when she is sitting on the toilet. But be careful! Your cell phone could end up in the toilet bowl!
Decorating the bathroom with pictures of your child’s favorite character or putting some favorite books in the for her to read should help to make it a more interesting and fun place to be.
Set Aside Some Special Rewards
Next, you must identify some special rewards for your child. As with other skills, it is best when the rewards you have chosen for toilet training can be saved for toilet training only. These rewards should not be available to your child at other times. Some parents have success putting a favorite candy or other treat where their child can see it, but not reach it. For example, a treat can be placed high on a shelf or hung from the ceiling or towel hook on a string. Another type of reward could be 5 -10 minutes of time to play with a tablet or cell phone. The important thing is to only give this special reward to your child when she pees or poops in the toilet. These are only general suggestions. You know best which things will be reinforcers for your child. Whatever you pick, make sure that your child doesn’t get that reward at other times. For now, these special toilet training rewards should only be used for successes in toilet training.

You will also need a picture of the toilet. This can be a picture of your own toilet or a similar one that you print from the internet or cut from a magazine. If your child is already speaking and can say ‘toilet’ or “want toilet,” she won’t need to use the picture to request the toilet. But, it may still be a helpful reminder to have one where your child can easily see it. Now you’re ready to get started.
Getting Ready
We suggest starting Part 1 of toilet training by taking off your child’s clothing from the waist down. This is so both you and your child can see any accidents happen as soon as they begin. This gives you the best chance to correct the accident “mid-stream.” Of course, if you or your child does not feel comfortable with this, it is OK to keep your child in underpants or shorts. If your child is fully clothed, it may be harder to catch an accident. It’s important to have as many chances as possible to reward your child for urinating (even a little bit!) into the toilet.
If possible, plan to spend time in a room that is close to the bathroom so it’s easy to clean up any accidents. If you have area rugs, put them away before you begin. If you have wall-to-wall carpeting, lay down a thin layer of plastic sheeting. A tiled or linoleum floor (like a kitchen) close to the bathroom is best.
Be sure your child drinks plenty of fluids. That should give her more chances to practice using the toilet.
Offer your child his or her favorite drinks (even soda or other sweet drinks, even in the morning). Give her plenty of salty food snacks, like pretzels and chips. The goal is to keep your child thirsty so that she will keep drinking. The more your child drinks, the more there will be chances to practice using the toilet during this training period.
Teach Your Child to Initiate (Starting on her Own)
This is an important step that people often skip. You can start teaching your child to initiate use of the toilet by prompting her to ask for the toilet before each sitting. Then reinforce the request. Learning to ask for the toilet completely on her own may take months. But, once a child learns how to do this, she will have fewer accidents. This is especially true when away from home in an unfamiliar environment.
After about 10 minutes of playing, eating, reading or any fun activity, help your child initiate going to the toilet. Do this by having your child hand you the picture of the toilet or by prompting her to say ‘toilet’ if she can do that. You can say “potty” or whatever word your family uses for toilet. Praise your child for giving you the picture or asking for toilet. Do this even though you prompted her. Then bring your child to the toilet and have her sit down.
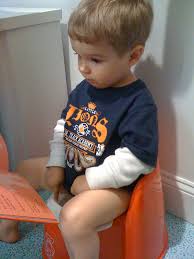
Sitting Versus Standing
We suggest having your child sit on the toilet to urinate when you are toilet training. This is easier even for boys. In many cases it’s easier to teach children to have BM’s on the toilet if they can already sit and urinate. You will have plenty of time to teach your child to stand while urinating in the toilet once he is toilet trained.
Scheduled “Sittings”
The sittings should be 3 to 5 minutes long. If you think 4 minutes is too long for your child, start with 3 minutes. See what works best for your child and then try to stay consistent. Don’t have your child sit for 3, then 5 minutes. Try to make sure it’s close to the same every time. It’s best not to keep your child on the toilet for longer than 5 minutes. If you do, your child may start to see the toilet as an unpleasant place. You don’t want that! It may be helpful to use a timer. That way, your child will learn that when the timer goes off, it is ok to get up from the toilet. The timer will also help you keep track of time so you can keep sittings the same length. Reinforce your child while she is sitting on the toilet. You can use lots of positive attention, praise for good sitting, books, music, or anything else she likes. Make sitting on the toilet a fun thing for your child. Save the most powerful reinforcer, like a favorite toy or a favorite candy, for after your child urinates in the toilet.
If your child doesn’t urinate on the toilet during the 3-5-minute sitting, take her off the toilet and return to the other room. Continue playing, eating, or whatever you were doing before the toilet sitting. Continue for another 10 minutes and then repeat the process. Use a timer to help you remember when it’s time for the next toilet sitting. Each time you repeat this process, begin by prompting your child to initiate the sitting by handing you a picture or saying “toilet” or “want toilet.”