

Matching
The last basic skill that we will talk about in this module is matching. Matching is another important early learning skill. Matching helps children understand concepts and categories, like shape, color, animals, and “things we eat.” Many children’s toys, such as puzzles and shape sorters, are designed to teach and practice matching skills. Many children can learn to match pretty easily. For this reason, teaching matching is a good way to build confidence and compliance. If matching is easy for your child, this will be a good opportunity for him to practice good learning skills. He will earn lots of rewards for paying attention to you and following instructions. Even if he already knows how to do it, we encourage you to work on matching skills for these reasons.
Matching Identical Objects
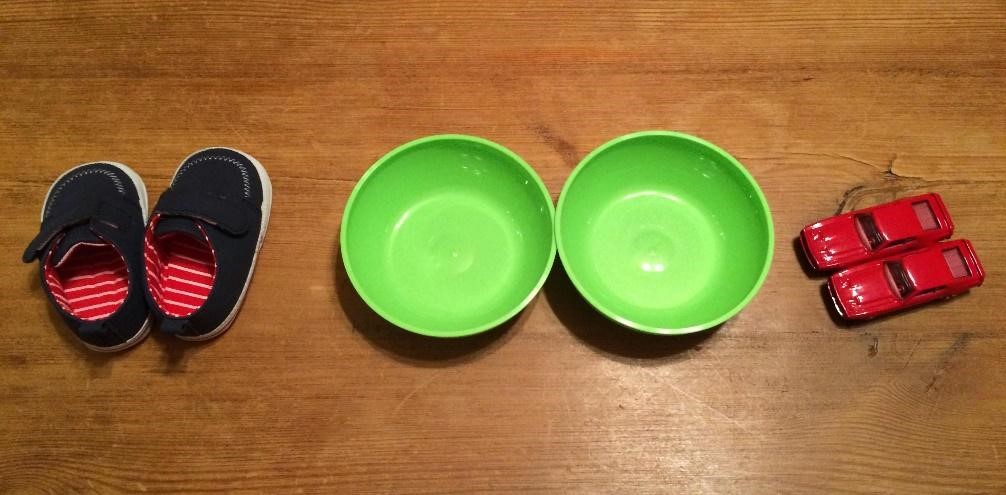
We begin by teaching children to match identical, everyday objects. This is usually the easiest and most functional place to start. You will likely have plenty of materials in and around your home to use for this teaching program. For example, you can use a pair of children’s shoes, mittens, spoons, cups, bowls, blocks, toy cars, markers, or crayons. In fact, you can use anything for which you have two of the same thing. You can use whatever you have on hand. All that is important is that you use pairs of objects that are identical. They should also be familiar to your child. It’s especially helpful to select objects that are small or light enough for your child to handle easily.
Pick three pairs of objects to start. It is best to choose pairs of objects that look very different from one another, such as being a different color, shape or size. For example, two green bowls, a pair of blue shoes, and two red toy cars would be a great set of matching materials to start off with. Also, it’s a good idea to choose objects that you would like your child to learn the names of later on. This will be a good way to start giving your child lots of chances to hear the name of each object while looking at it.
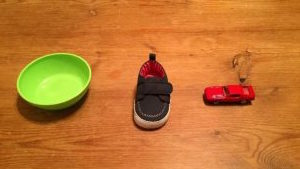
To begin, place one of the objects from each pair on the table or on the floor in front of your child. In our example, this would be one green bowl, one blue shoe, and one red car.
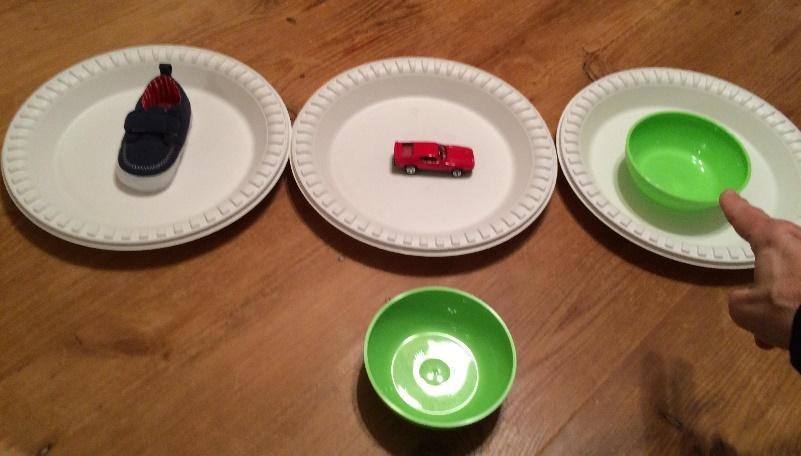
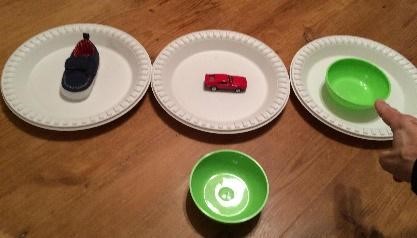
It may be helpful to place a paper plate or a piece of paper under each object, as shown below. This gives your child a ‘target’ area for where to place the objects when he is matching. This is most helpful for objects such as the shoe or the toy car, that do not fit easily inside of one another as the bowl does. Keep the match for each object out of your child’s reach. Hand your child only one object at a time, in an unpredictable order. Each time you hand your child one of the matching objects, give him a simple instruction, such as “match” or “match bowl,” or simply use the name of the object you have handed him. For example, as you hand your child the bowl, you say “bowl.” Then, prompt him to place the bowl he is holding inside the one on the table.
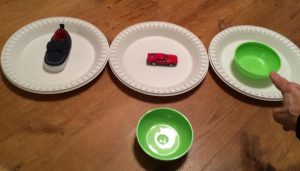
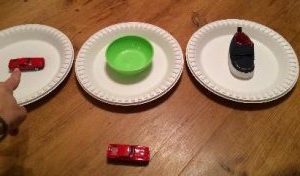
Here’s another example:
|
Remember to change the placement of the items on the table periodically. And, present the trials in an unpredictable order. You want to make sure your child can match the bowl in all three positions. You also want to make sure that he cannot predict which of the three objects you will hand him next.
And, of course, remember to reward your child with praise paired with tickles, bubbles or a little treat. In the following clip, you will see a boy learning to match a white cup, a red block, and a silver spoon for the first time.
Did you notice that his teacher begins by prompting him using a hand-over-hand prompt? This way, the child knows exactly what to do. Then the teacher fades the prompt to a point prompt. You may also have noticed that when he responds correctly, his teacher praises him enthusiastically and then places a small yellow circle onto a board. That board is called a token board. The child is learning that when he fills his token board with circles, he can take a break from his learning session and play with a favorite toy or do a favorite activity. We talk more about token boards in Module 6 (Problem Behavior).
Now watch a clip of the same boy about a week later, matching those same three objects with another teacher. He is now completely independent in matching. No prompts are needed.
Notice how much more sure he appears to be after a week of learning sessions. You might also have noticed that the second teacher used only the names of the objects. For example, she said only “spoon” rather than saying, “match” or “match spoon.” By using only the one word for this particular child, she hopes to make him more familiar with these words later on.
Here’s another little boy working on learning to match. His teacher is now using only a point as a prompt. He is doing a good job following her prompts. She is also using only the names of the objects as her instruction.
Choosing the Language Level of the Instruction
For children who understand more language, you can use more complicated instructions, though you always want your instructions to be very clear. For example, when handing the block to the child, you could ask, “Where does this go?” or, “Can you find the match?” Decide which instruction you would like to begin with and then try using just that one type of instruction for a while, so that you don’t confuse your child.
Once he’s learned the concept of matching, you can begin to vary the instructions. Eventually you want your child to be able to match things correctly when given instructions using different words (for example, “put with same”, “match”, “where does it go” or “match the bowls”).
‘Probe’ (Test) Occasionally to See if Your Child Can Respond Independently
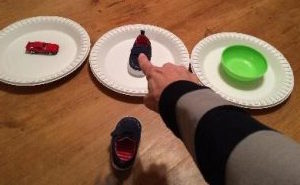
Some children are very good at puzzles, shape sorters or other toys that require visual matching skills. If this is the case with your child, he may be able to do matching without help right from the start. If you think this might be the case, you should present a few trials without a prompt to see what happens. Does he respond correctly without help? Check to see if he responds correctly in 8 or 9 out of every 10 trials. Do this 2-3 times over a day or two. If he is correct at least 8 out of 10 times, try introducing a fourth object. In the picture below, a blue mitten is added to rotation. Lay the fourth item on the table with any two of the other objects. Rotate through the objects he can already match but include the new object every time. Don’t forget to reinforce him with praise. And you can give a tickle, bubbles, or some other type of treat, for every few correct trials.
When you think your child may be ready to respond correctly, test this by giving him the instruction NOT followed by a prompt. This trial is called a probe.

Continue on like this, teaching him to match new items. Do this by prompting the correct response and then reinforcing it immediately. Fade your prompts as slowly as you need to in order to avoid errors. Withhold your prompts sometimes to see if he will respond correctly on his own. In the following clip, you will see the teacher do one trial where he prompts the child to match two blocks, followed by a trial for matching cups. He does not prompt on the second trial, and the child matches the cups correctly all by himself. His teacher praises him with great enthusiasm and gives him two tokens, instead of the usual one. This is a special treat for doing it all by himself.
If your child does not respond correctly when you test to see if he can do it all by himself, that’s OK. Do not show any disappointment. Just maintain a neutral expression and pause quietly for 2-3 seconds. Then go back to prompting so that you will have plenty of chances to reinforce correct responses. If he has learned to match certain objects successfully, don’t forget to practice matching with these items. Do this by continuing to present trials of mastered or learned items, mixed in with newer items. And always present the trials in an unpredictable order. Reinforce all correct responses. Do this whether they are prompted or not. If after several days of practice your child has difficulty learning to match identical objects, make it easier. Try laying out only two objects at a time, instead of three.
Trouble Shooting
Some children tend to be distracted by objects. They are much more interested in handling or playing with them, than in matching them. If that happens with your child, even after a few days of practice, you could try attaching the three objects to a piece of heavy cardboard or foam board with Velcro. Then show your child the object you want her to match but do not allow him to hold it. Instead, prompt him to point to the matching object. In the following clip, you will see an example of this. Also, note that the teacher waits for eye contact before presenting the trial. This is because the child’s attention is focused elsewhere. She wants to make sure the child is paying attention to her. She also reinforces the child enthusiastically when she responds correctly all by herself without prompts.
Picture Matching
Typically, it’s easiest to begin with matching objects and then move on to pictures as a second step. But as we have said before, all children learn differently. For some, it may be easier to learn to match using pictures first. This is especially true if they tend to be distracted by objects. So, if your child continues to have difficulty matching objects, you might try the same thing using pictures. Use two identical pictures instead of objects.
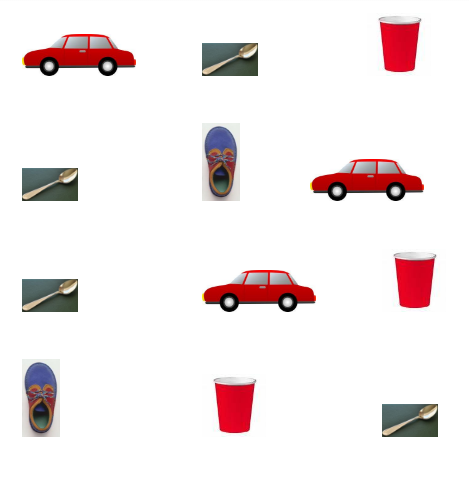
Whether your child learns to match using objects or pictures as a first step, you should continue by adding only one new pair of objects or pictures at a time. Mix the new set in with the ones he has learned well, in an unpredictable order. For example, say that the first three items your child learns to match are a cup, a shoe and a car. Once he is routinely matching those three item pairs correctly, no matter which order you present them in, you should introduce a new pair. In the rows of pictures below, the new item is a spoon. When you introduce the pair of spoons, put a spoon on the table next to any two of the original three objects. Your child should always have three pictures (or objects) to choose from. See below.
It’s fine to see if your child is able to match the new item on the very first try without help. Remember though, when you are just beginning to work on matching, you will probably need to prompt the child to match the new item. Then fade your prompts gradually. Your child should need little or no help with any of three items he’s already learned to match.
Generalized Matching Skills
Eventually, your child may be able to match almost anything you give him, on the very first try. If this happens, it means that he has probably generalized the skill of matching identical objects or pictures. This means that he can match pretty much any identical objects or pictures.
In other words, he has learned the concept of matching two identical things. We talked a little bit about generalization when we discussed imitation. Here is another example. If you have been driving a car for many years, chances are you have generalized driving skills. Therefore, you could get into an unfamiliar car and drive it. You would need just a few minutes to practice with that particular car. When a child has generalized matching skills, he should be able to match nearly any pair of identical objects you put in front of him. The idea of generalization is a very important one and we will talk more about in other modules.
If your child can match almost any pair of identical objects or pictures you gave him, on the very first try, he has probably generalized the skill of matching identical objects or pictures. In other words, he has learned the concept of matching two identical things.
When your child has generalized identical matching skills you will be ready to move on. He will be ready to learn to match objects to pictures. He should also be ready to learn to match pairs of objects or pairs of pictures that are similar but not exactly the same. You should also be able to teach him to match colors and shapes. He may even be ready to match letters and numbers. From there you will also begin to work on sorting things into categories. We will talk more about this later. Here’s a clip of a little boy learning to match shapes.
Knowing When, and When Not, to Increase the Length of Learning Sessions
Don’t be afraid to test and see if your child is ready to add a few more trials of each teaching program. You may also want to try adding a few more teaching programs to each lesson time. But remember that if he is really tired or frustrated, he will not learn well. And he will not enjoy the learning sessions. If you think your child is becoming frustrated, you can try giving him something that’s easier for him to do. You always want your child to feel good about his learning sessions. Just move on to a different teaching program. For example, if you’ve been working on following instructions without objects and this isn’t going well, move away from a language activity to something like motor imitation or matching. If you do that, and sense that he is still tired or frustrated, instruct him to do something you know he can do easily. Prompt if necessary, praise him and then take a break. This way, you will be ending the session on a positive note.
Module Review
So now we have talked about setting up your special sitting and learning sessions. We also suggested some early skills to teach, like requesting, imitating, following simple instructions with and without objects, and matching. You can teach all of these things while also working on increasing your child’s ability to sit and pay attention to you for gradually longer and longer periods of time.
Now we are going to ask you to answer some questions about what you have learned. Some of the questions will have choices and some will be true or false questions. A good way to work on these questions is to think about the answers, make your best guess and then read on to have the answers explained. There will be 10 questions. If you answer all of the questions correctly, you are probably ready to try out some of the suggestions we have made in this section and maybe also move ahead to the next section. However, if some of the questions were difficult for you, or, if you answered them all correctly but feel you could benefit from reviewing this section, or parts of this section, you might want to do some review before moving ahead.