

More on Functional Communication Training (FCT)
One skill that can help to prevent problem behavior is to teach children how to say “no.” Then they can say ‘no’ to things they do not want. Or they can ask nicely for “help” or for “a break” or to be “all done” with an activity they want to stop. It is important to give the child a way to say, “No thank you!” Sometimes, even if you really want your child to do something, it’s better for him to say, “No,” than to have problem behavior as a way of saying “no” to you.
Sometimes It’s Ok to Take “No” for An Answer
When you start teaching a child to communicate “No thank you,” you must let the child know you understand what he wants. It’s a good idea to say “OK” as often as you can. When your child gets to be good at using words, signs or PECS (Picture Exchange Communication, Module 13) to say, “No thank you,” you can then work on getting him to understand that he can’t always have what he wants. In the beginning, when he is first learning to ask for a break or for help or to be all done, it is important to reinforce this whenever you can. You do this by giving him what he wants. So even if you’re busy, or teaching him and don’t want to take a break, be sure to give him a break if he asks for one. You can make it a short break, like 2 or 3 minutes, but what a great time to reinforce this nice asking!
Teaching Finished or All Done
To teach this skill, think of a time your child wanted to avoid something. A common time is at the dinner table. Children often get bored and start to cry when they’ve finished eating and they want to leave the table. This is very true for young children in highchairs who can’t leave the table without help. For children who cannot speak, this can be very frustrating. If this is the case with your child, one idea is to put a picture showing “all done” on the table or tray in front of him that he can reach.
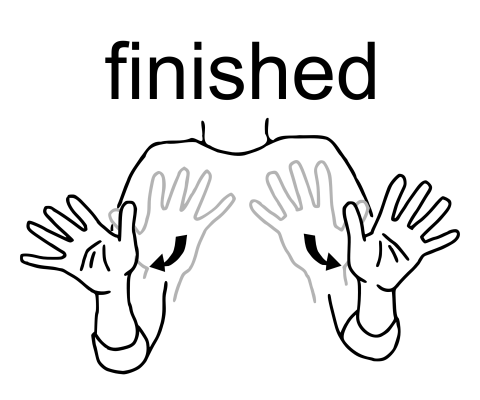

NOTE: This drawing shows an international sign for “all done.” You can use this, or make your own picture, showing your own sign for “all done.” You can use any picture you think will work. For example, you could make up a hand sign for “all done” and have someone take a picture of you making the sign. Then you could use that picture. Check out www.babysignlanguage.com for lots of simple signs.
And you don’t have to wait until your child starts to be very upset. As soon as you see that he has finished eating and is beginning to get bored, prompt him to hand you the “all done” picture. Then say, “All done!” and help him down from the table right away. Over time, fade your prompts until he is asking to be all done all by himself.
You can also teach your child to make the sign for “all done” as shown in the picture just above. To do that, the child should start with both of his palms facing his face and then twist his hand so his palms are facing away from him. One good thing about this method is that he will be able to use it any time, whether or not you have an “all done” picture he can reach. The sign for “all done” looks like this:
Teaching Your Child to Ask For A Break
You can do this same thing any time your child needs a break. For example, if you are teaching your child a new skill and he is getting frustrated, that would be a great time to prompt him to hand you a break picture, or to ask you for a break using the break sign, which looks like this (forming a “T” shape with your hands, as in the picture of the football player).

Of course, your child won’t learn how to do this right away. It will take practice, so you have to watch for chances to practice this skill with him by prompting him as soon as you see signs of distress, frustration, or boredom.
Teaching Your Child to Communicate “No”
“No” is a very important word, or gesture, to teach. After all, we should all be able to say “no thank you” when someone offers us a food we don’t like or asks us to join in an activity we don’t want to do. Watch for times that you offer your child something and he runs, screams, or jerks his head away. Wait until he is calm before offering it again, but this time, immediately prompt him to shake his head no or put up his hand in a gesture that means “no.” If he can imitate words, prompt him to say “no” or “no thank you” if he is able.

If you prompted a gesture, as soon as he begins making the gesture for no, say, “No thank you!” and remove the item quickly. A good place to practice this is during dinner. You can sometimes offer food choices that you know your child does not like, prompt him to make the gesture for “No thank you!” and then remove the food you have offered.
Here a boy is being taught to nod for “yes” and shake his head back and forth for “no.” The child can see the Play-Doh and that’s what he wants. So when offered the block first, the teacher has a chance to prompt him to shake his head for “no.” Then the teacher offers him the Play Doh and prompts him to nod for “yes” which he does happily.
Teaching Your Child to Ask For Help
Finally, the word “help” is another important word or gesture to teach. If your child can ask for help, using a PECS picture
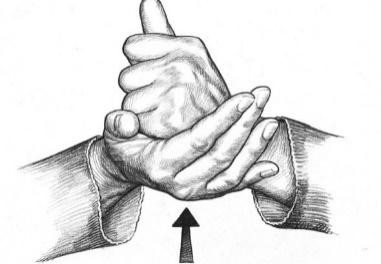
or using a gesture, then he won’t become so frustrated that he has problem behavior. Here is what the sign for “help” looks like. Make a fist with one thumb pointing up, place that fist in the palm of your other hand and move both hands up together.
Look for times when your child is having trouble with something. Prompt your child to use a PECS picture to ask for help. Or you can use a physical prompt to show your child how to make the gesture that means “help.” Then as he makes the gesture or hands you the picture, say, “Help!” and then help him right away.
In the next clip, the little boy’s favorite toy is in a closed, clear container. He can see it, but he cannot open it. Watch as one teacher prompts him to ask the other teacher for help so that he can play with his toy. She uses a physical, hand-over-hand prompt to show him how to make the sign for “help.”
We have been talking about how to teach non-verbal children (children who can’t yet talk) how to protest or communicate their desires for all done, break, no, help, etc., without crying, whining or engaging in problem behavior. If your child can talk, or is good at imitating sounds and words, of course, you can and should use words to prompt your child to say, “No” or, “No thank you,” if he is able. And you can also prompt him to say “All done” or “Break” or “I want a break,” or “Help” or any of the words you would like him to learn to use when he is frustrated or upset.
Imitation
As we have mentioned, imitation is another important ‘learning-to-learn’ or ‘foundation’ skill. Like eye contact and pointing, once your child learns this skill, you can teach her many things by having her imitate your actions.
In fact, all children learn a great deal by watching those around them and imitating the things they do. And for children who have difficulties with language, learning through imitating others is an especially important skill.
The basic skill is that when you say, “Do this” as you are making a movement, your child should copy what you are doing.
If you proceed to Module 9 (Special Learning Sessions), you will get specific instructions about teaching imitation. You will learn how to teach the skill of imitating actions with and without objects. In a later module, we will talk about how to teach children to imitate sounds and words. For now, take advantage of opportunities throughout the day to teach simple imitation when you say, ‘You do,’ or ‘Do this’.
For example, if you are having playtime or listening to music, you can take a spoon and give your child a spoon. Bang a simple rhythm on a plastic plate or the floor (for example, bang three times); then say, “you do.” If your child does not try to imitate you, help her by putting your hand over hers and help her bang three times. You can do this several more times, trying to give less help each time. Make the activities enjoyable (as banging is for toddlers).
Let’s watch a video clip that we saw in Module 2. This video clip shows a teacher using prompts to help a little girl learn how to imitate or copy her movements. She holds her own arms up high and then helps the little girl to lift her arms too.
Notice how the teacher needs to use a full physical prompt the first few times. But then, the little girl begins to understand what the teacher is asking her to do and starts to do it all by herself! She is just beginning to understand what it means when the teacher says, “Do this,” or “You do.”
Be sure to find activities that your child enjoys doing and then find ways to encourage her to try new things by imitating you. In the next video clip, the teacher is showing a little boy new things that he can do while playing in the sand box. Notice how he does simple things like scooping sand into a mold and then patting it down before turning it over. Then he says, “You do,” and praises the little boy for trying to do the same thing.
Another example of activities toddlers enjoy is knocking things down. Stack 3, or 4 blocks while saying ‘up, up, up’ and then say, “down” just before knocking them “down!” Do this with an extra block or two each time. If needed, prompt your child by moving her hand toward the stack. And you can make stacks out of lots of things!
In the next video clip, a teacher and a little boy are having great fun stacking toy ice cream scoops and knocking them down. Watch how the teacher models this for the little boy and then tries to get him to do it by himself by moving his hand toward the ice cream stack. When he pulls back, she just models it again but leaves one of the scoops on the cone. Then the little boy knocks the last scoop onto the floor with a flourish!
To stress the idea of imitation, you can make two stacks. Then you can knock one down and then say, “You do” and let her knock down the second stack.
During dressing, you can say “do this” while putting your arms up, and then help your child to put her arms up into her sleeves. In order to teach imitation without any object, you could hold her hands and say “do this!” as you jump. If she doesn’t jump, repeat your jump and then help her jump by lifting her gently off the floor. There will be many chances through your day to work on teaching imitation. Remember to keep the activities enjoyable. For example, you could blow bubbles and pop some. Then you could blow more bubbles and say, “you do!” Or you could put on a funny hat and hand her one, etc. We will give you a lot more information about teaching your child to imitate in Module 9. But, for now, we just want you to introduce your child to the idea of imitation.