

First/Then Boards
One way to let your child know what you want him to do is a First/Then board. Using a First/Then board, you can let your child know that something he likes or wants is coming, but he has to do something else first. Often, when children understand that they will soon get what they want, they are able to wait for it more patiently. Here’s an example of a First/Then board we made using pictures taken with an iPhone and Google Images. The message you are giving is: first put the blocks in a bowl and then we can play with the Pig Popper toy.
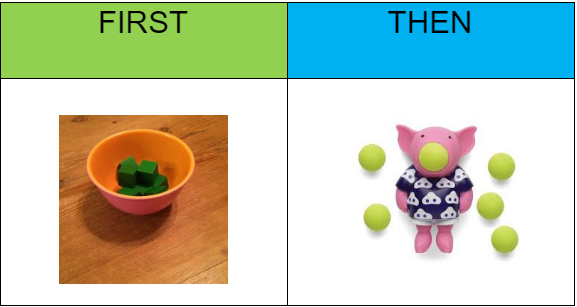
To use a First/Then board, point to the picture on the “First” side of the board. Then immediately point to the real toy or task. If your child doesn’t start on his own, prompt him to begin the task. You could put the first block in the bowl or help him to do it. As soon as your child finishes the task on the left side of the First/Then board, he should immediately get the reward on the right side of the board. He probably won’t understand the board right away. But with practice he will likely come to understand it. And once he understands, you can use it to help him through times where waiting is hard for him. Here the teacher shows the child the First/Then board, explaining that blocks in bowl comes first then he can play with the pig.
Adding Tasks to the First/Then Board to Make a Picture Schedule
Once your child has learned how to complete a few different toys all by himself, you can use a short picture schedule. This will show him that you would like him to play with two or three toys before taking a break. To make a picture schedule, take pictures (or find them on the Internet) of your child’s favorite toys and favorite treats or rewards. If you have paper protectors or self-adhesive sheets, you can use those to make the pictures last longer. Then, you can use Velcro on the back of each picture and on whatever material you want to use for your First/Then Board.
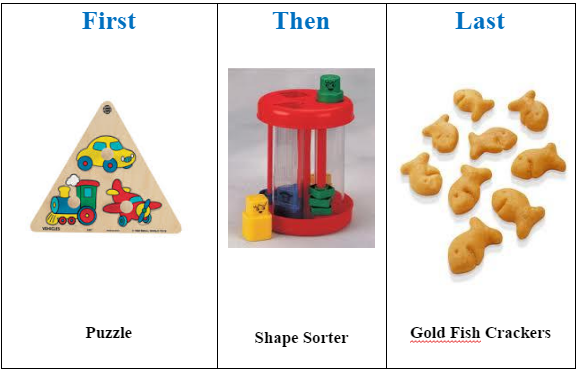
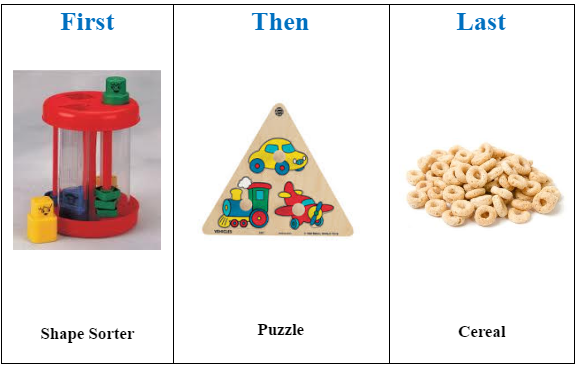
Here’s a very simple toy play schedule. By changing the toys and changing their order, your child will have more chances to be flexible in the way he plays with his toys. For example, this picture schedule shows the child that he is going to make his vehicle puzzle, then put the shapes in his shape sorter. And then he will get some crackers.
 The next time the child is asked to play with these two toys, change the order of the toys in the schedule. You can even change the treat he gets when he is finished.
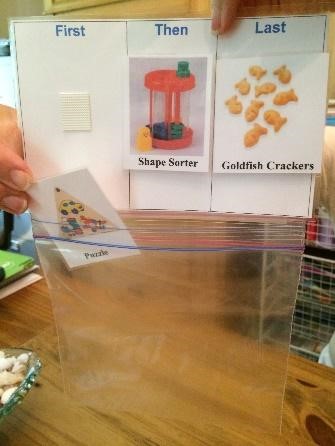
It’s a good idea to change the order of the toys you put into a toy play schedule. This is so that your child learns to follow the picture schedule and not just play with these toys in the same order each time. There is one way to make toy play picture schedules very easy to follow and very easy to change. Just make one toy play picture schedule board and Velcro the pictures onto the board in any order you like. You can even put a small envelope or bag on the bottom of the schedule board. You can then teach your child to take a picture from the board and put it in the bag each time he does the activity in the picture. That shows that the task is ‘all done’.
In the next video clip, you will see a little boy learning to follow an activity schedule. The schedule shows him to string his beads and do a simple puzzle and then he can play with the little pig popper toy.
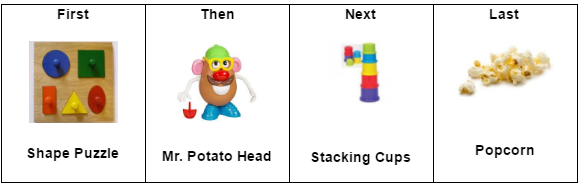
Here’s another example of a picture schedule, this one showing that three tasks (a puzzle, a Mr. Potato Head toy, and stacking cups) should be done. Then it will be time for popcorn!
We talked more about first/then boards and picture schedules in Module 6 (Problem Behavior). Picture schedules are a great way to help children understand what you want them to do and what’s coming next. This can go a long way to helping him not be frustrated and building cooperation.
How Long Should Learning Sessions Be?
The amount of time a child can stay in his chair or on the floor and pay attention will be different from one child to the next. Very young children will probably only be able to sit still for a minute or two at first. Teaching your child to sit with you and pay attention to you for longer times will probably be a slow process. Even some older children may find it hard to do this. You can start with as little as 30 seconds or as much as 10 to 15 minutes. It all depends on what your child is ready and willing to do. If your child really wants to leave the learning place, think about using less time and effort before he can take a break away from the learning place.
Make It Successful and Fun
Remember to stay with tasks that have a clear beginning and end. This helps your child see when the task is done. You don’t want to start off with your child feeling that it’s too hard. If that happens, it can take days or even weeks to make him happy in his learning space again. Remember, happy learners learn more! It’s always best to go slow in the beginning. This means it’s safer to start just a little under your child’s ability. That way, he will be successful from the very beginning. And he will learn that your special learning sessions are a fun and rewarding time with you. Starting off with hard tasks can lead to frustration and distress.
Continue to work toward cooperation until your child is able to sit with you and complete at least two simple activities. These can be, for example, an easy puzzle and a shape sorter. Or putting blocks in a bowl and stringing three beads. Some children may be ready to do this on the first day. For others, it may well take several weeks or longer. That’s okay. Just stay with it until your child can complete at least two simple, short activities with you. And this is important: he doesn’t need to do the activities without help. He needs only to be willing to try and to accept your help to do the tasks. Some children will already know how to follow simple instructions with objects. But others will need to work on this, which is the next thing we will show you.